Class Management
Complete guide to creating and managing classes
Class Management
The Class Management section allows administrators to create, schedule, and manage classes in Lumus LMS. This includes assigning teachers and students, setting schedules, and organizing academic activities.

Overview
Class Management enables you to:
- Create new classes with schedules, fees, and staff assignments
- Assign lead teachers and teaching assistants
- Enroll students and manage rosters
- Build course content, assignments, and announcements inside each class
- Bulk create or edit classes from CSV
Creating a New Class
Step 1: Navigate to Classes
- Log in to the administrator dashboard
- Open Classes under Overall Management
- Click + Add Class
Use the Filters bar to search by class name, teacher, subject, class mode, or batch term. Switch between grid and list view with the toggle at the top right.
Step 2: Enter class details
In the Add New Class modal, fill in:
- Class Name and Batch Term
- Default Timezone
- Subject and Teacher (required)
- Teaching Assistants (optional multi-select — replaces the existing TA set on save)
- Class Schedule — pick day, start time, end time, then click + Add
- Fee (USD) and Fee (PKR)
- Class Mode — Virtual, In-person, or Hybrid

Scroll down to add:
- Course Outline
- Thumbnail and Cover images
- Enable Public Sale — list the course on the public catalog


Step 3: Save class
- Review all entered information
- Click Save
- The class appears on the Classes page and is ready for enrollment
Bulk Create/Edit Classes
- Go to Classes
- Click Bulk Create/Edit
- Download the CSV template and fill in class details
- Upload the completed file to create or update many classes at once


The template includes columns for name, batch/term, subject ID, teacher ID, fees, schedule, and optional public listing fields.
Class card actions
From the Classes grid, open the ⋮ menu on any class card:
- View Details — open the class page
- Edit — change name, schedule, fees, teacher, or TAs
- Manage Enrollments — enroll or unenroll students
- Duplicate — copy the class for a new term
- Delete — remove the class


Opening a class
When you open a class from Classes, you land on the class detail page. A row of tabs gives you access to everything for that class:
| Tab | Purpose |
|---|---|
| Home | Course content — sections and learning modules |
| Announcements | Post class announcements |
| Attendance | Mark daily attendance for the roster |
| Assignments | Create and manage assignments |
| Submissions Management | Review student submissions |
| Grades | Grade book |
| Files | Class file manager |
| Class Roster | Enrolled students, access, and payment status |
| Onboarding Links | Self-registration links for offline-paid students |
| Pending | Pending onboarding approvals |
Use the Enable Drip Content toggle at the top right to control scheduled module release for the whole class.

Course Home: sections and modules
The Home tab is where you build the class curriculum.
Add a section
- Open the class and go to Home
- Click Add Section
- Enter a section title (for example, Video Lectures or Week 1 — Introduction)
- Click Save

After saving, the section appears on Course Home. Use + Add Module, Quick assignment, or Attach existing from the section header to add content.

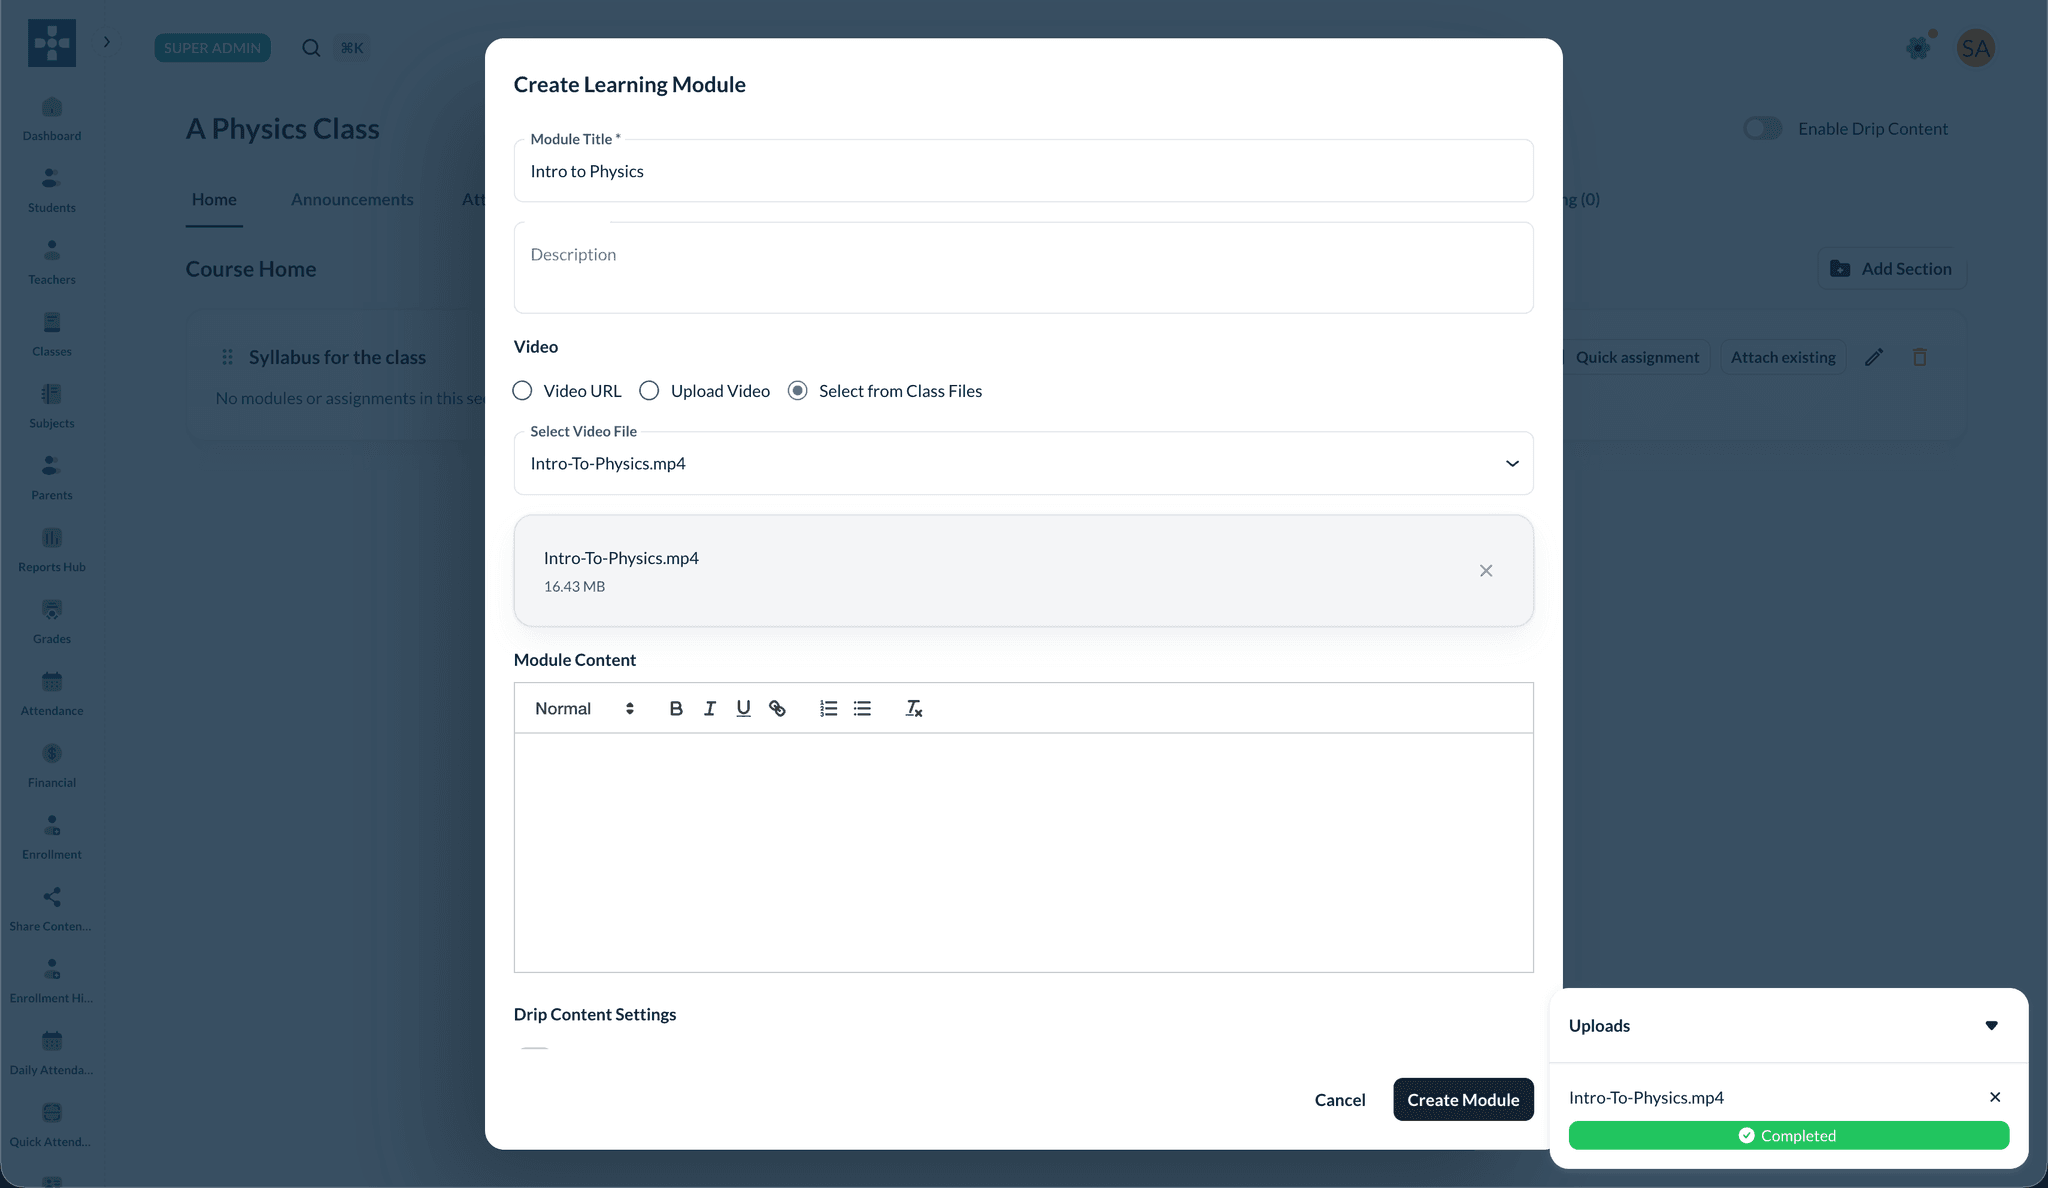
Add a learning module
- In a section, click + Add Module
- Enter a Module Title and optional Description
- Add video content using one of three options:
- Video URL — paste a YouTube or direct video link
- Upload Video — upload a file directly to Lumus
- Select from Class Files — choose a file already in the class file manager
- Use the rich-text editor for written module content
- Optionally configure Drip Content, Prerequisites, Public Preview, or Lock module for enrolled students
- Attach supporting files (PDF, documents, images — up to 10 files, 5 MB each)
- Click Create Module


Drip content and access controls
Turn on Enable Drip Content for the module to set a release date, delay days after prerequisites, and prerequisite modules. Use Lock module for enrolled students to hide a module until you unlock it manually.

YouTube and direct video links
Paste a YouTube or direct video URL in the Video URL field. The video embeds in the module for students.

Upload video to Lumus
Choose Upload Video or Select from Class Files to attach a video stored in Lumus. Keep the browser tab open until the upload progress shows Completed, then save the module.
Organize published content
Drag modules between sections or into Ungrouped, reorder items, and use the lock, edit, and delete icons on each row. A populated Course Home shows all sections, modules, and their publish status.

Class announcements
- Open the class and go to the Announcements tab
- Click + New Announcement
- Enter a title and body (rich text)
- Optionally Pin this announcement so it stays at the top
- Click Create Announcement

Editing Class Information
Edit a class
- Go to Classes
- Open the ⋮ menu on a class card and choose Edit, or open the class and edit from there
- Update name, batch term, timezone, subject, teacher, TAs, schedule, fees, class mode, course outline, or images
- Click Save

Enrolling Students in Classes
View the class roster
Open the class and go to the Class Roster tab to see every enrolled student with their enrollment status, access status, payment status, and Admin Bypass toggle.

Single Student Enrollment
Enroll students when creating or editing a student profile under Students, or use Enrollment Management to add a student to a class. You can also enroll from the class roster where the product exposes an enroll action.
Bulk Student Enrollment
Use Bulk Enroll on the Students list to import and enroll students from a CSV or Excel file in one step. See Student Management for the bulk import workflow.
Self-registration via onboarding links
For offline-paid cohorts, generate an onboarding link on the class Onboarding Links tab and approve sign-ups from the Pending tab.
Enrollment Rules
- Students can be enrolled in multiple classes
- Enrollment is subject to class capacity
- Students must meet any prerequisites (if configured)
Viewing Class Details
Open a class from Classes to reach the class detail tabs (Home, Announcements, Attendance, Assignments, Class Roster, and more). See Opening a class above.
Searching and Filtering Classes
Use the Filters section on the Classes page to narrow results by class name, teacher, subject, class mode, or batch term. Click Clear All to reset.
Best Practices
Troubleshooting
Issue: Cannot assign teacher to class
- Solution: Verify the teacher is assigned to the class subject in Teacher Management
Issue: Student enrollment failing
- Solution: Check class capacity and ensure the student is not already enrolled
Issue: Schedule conflicts
- Solution: Review teacher and student schedules to identify and resolve conflicts
Related Topics
- Teacher Management - Learn about assigning teachers
- Student Management - Understand student enrollment
- Attendance Tracking - Track class attendance
- Reports & Analytics - Generate class reports